Adding an order tracking page to your Shopify store can significantly enhance customer satisfaction and reduce the number of inquiries about order statuses. Many Shopify websites make the mistake of not having an order tracking page, which is frustrating and has a bad reputation. Nobody wants to order from a website and be ghosted for a day or week without knowing the status of their orders. It becomes essential to provide the order status to the customer when the order is confirmed, dispatched, picked up by courier, and out for delivery. Running a Shopify store efficiently involves offering great products and ensuring customers have a seamless shopping experience. One key component of this experience is the ability for customers to track their orders.
Let’s know how to add an order tracking page to your store.
Steps to Add an Order Tracking Page to Your Shopify Store
Step 1: Choose a Tracking Solution
There are many ways to implement order tracking in your Shopify store—here are a few popular methods:
- Shopify’s Native Order Tracking: Shopify provides an essential order tracking feature that customers can access through their order confirmation email.
- Third-Party Apps: Apps like AfterShip, Tracktor, and ParcelPanel offer more advanced tracking capabilities and customization options.
Step 2: Install a Third-Party Tracking App
The third-party app lets you configure the order tracking page smoothly. You can configure this by yourself as it allows flexibility when integrating with the Shopify store. If you opt for a third-party app, follow these steps to install it:
- Go to the Shopify App Store.
- Select and install an app.
- Configure the app.
We suggest you use the AfterShip tracking app, but many other order-tracking apps are available. Choose any that suits your requirements and proceed with the configuration.
Step 3: Create a New Page for Order Tracking
Whether you use Shopify’s native features or a third-party app, you must create a dedicated tracking page on your store. A separate page will allow you to customize and configure it differently for a better user experience.
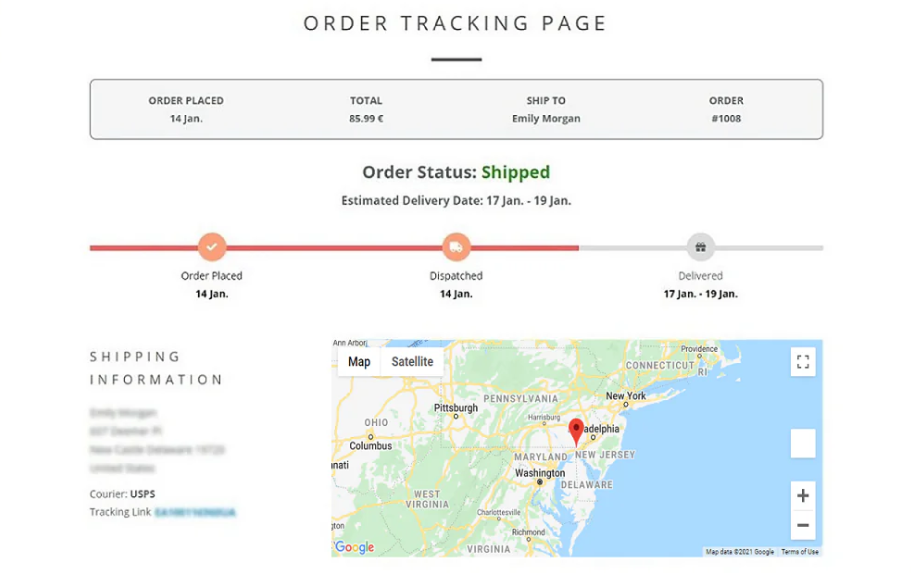
Here is how it looks when you focus on creating a page for tracking only. It not only helps customers track their orders, but it also creates trust between customers and brands. Let’s create a new page in the Shopify Store.
-
- Log in to Your Shopify Admin
- Create a New Page:
- Navigate to Online Store > Pages.
- Click on the Add page.
- Add Content to the Page:
- Title the page (e.g., “Track Your Order”).
- If using a third-party app, follow their instructions to embed their tracking widget. This usually involves copying and pasting an HTML snippet or using a Shopify Liquid code.
For example, with AfterShip, you might embed a tracking form like this:
html
<div id=”aftership-tracking”></div>
<script type= “text/javascript”>
(function (a, f, c, e, b) {
var d = {
“_aftership”: {
“app_key”: “YOUR_APP_KEY”
}
};
var g = f.createElement(c);
g.type = “text/javascript”;
g.async = true;
g.src = e + “/aftership.js”;
var h = f.getElementsByTagName(c)[0];
h.parentNode.insertBefore(g, h);
a[“aftership”] = b
})(window, document, “script”, “https://assets.aftership.com/v4/tracking”, “aftership”);
</script>
-
- Customize the Page Content:
- Add any additional information or instructions for your customers.
- Please briefly explain how to use the tracking tool and what information they will see.
- Publish the Page:
- Click Save to publish your new tracking page.
- Customize the Page Content:
Step 4: Link the Tracking Page in Your Store
To ensure your customers can easily find the tracking page, add a link to it in your store’s navigation menu and other relevant places. The purpose of showing the page on the website is to be identified by customers. However, whenever a customer orders, he should get a tracking link in his email or SMS to reach the tracking page for status. Other than that, linking to the footer and main menus helps customers find the page.
-
- Add to Main Navigation:
- Go to Online Store > Navigation.
- Select the menu where you want to add the link (e.g., Main Menu).
- Click on the Add menu item.
- Name the menu item (e.g., “Order Tracking”) and link it to your created tracking page.
- Click Add and then Save menu.
- Repeat the above steps to add the link to other navigation menus, such as the footer.
- Add to Main Navigation:
Step 5: Test the Tracking Page
Test certain order stages like dispatch status order, order processing status, canceled order, returned order, etc. Ensure that each stage of the order works correctly before making it live in the store.
-
- Place a test order.
- Use the tracking page using the order ID.
Step 6: Inform Your Customers
Once you have verified that the tracking page works correctly, inform your existing customers about this new feature. Also, send the order tracking code with the page link whenever someone places an order. This way, they can easily track their order using tracking code.
-
- Email Notification: Email your subscribers to announce the new order tracking feature.
- Social Media: Post about it on your social media channels. Or create an effective social media campaign to raise awareness.
- Banner or Announcement Bar: Use a banner or announcement bar on your website to highlight the new tracking feature.
Conclusion:
Adding an order tracking page to your Shopify store is crucial in enhancing customer satisfaction and reducing the burden on your customer service team. Following the steps outlined above, you can quickly implement a tracking solution that fits your store’s needs. Whether you use Shopify’s native features or a third-party app, providing this transparency will help build trust and encourage repeat business from your customers. Remember, support is always available to assist you with any difficulties.